


Implementing a Cache in NodeJS Using Redis
This article is the third in my Caching series. If you have no idea what Caching or what Redis is, please read my article on caching and Redis respectively, before proceeding.
Assuming you have an understanding of what Caching and Redis are, let's build a very basic project that implements caching using Redis.
Project Info
We can term this project GitHubRetro, we would be retrieving usernames via the GitHub API. This project aims to compare the latency of retrieving data with and without caching. With caching, there should be low latency and without caching high latency.
I explained the concept of latency in my previous article
Prerequisite
To follow this tutorial you would need:
A Code Editor: A code editor is a text editor program designed specifically for editing the source code of computer programs. It may be a standalone application or it may be built into an integrated development environment (IDE). An example of a good code editor to work with is VsCode.
Node.Js: Node.js is a JavaScript runtime built on Chrome’s V8 JavaScript engine. It is used for building scalable network applications. Node is needed to run the application and install the necessary dependencies. You can check out my article or the official documentation on Node.Js, so you can get it installed.
Redis: Redis is an in-memory data structure store that is used as a database, cache, and message broker. See my article to get Redis installed on Linux, macOS and Windows.
API Client: It is a software tool that sends HTTP requests. APIs use HTTP to communicate with different types of clients on the network. Thunder Client and Postman are examples of API clients. For this tutorial, I would be using Thunder Client.

Project Setup
Before getting into implementation, we need to set up our project. We need to create a directory, initialize npm and install the necessary modules.
Using the terminal, create a directory to hold the project.
mkdir GitHubRetroNavigate into the directory.
cd GitHubRetroInitialize npm.
npm init -y💡Initializing npm creates apackage.jsonfile. You can learn more about the package.json from my previous article.Installation of dependencies.
The packages we would be working with are;
expressA web server framework for Node.js.AxiosA Node.js HTTP client, which helps make API calls.node-redisA Redis client for node that allows you to store and access data in Redis.Run the code below in the terminal:
npm install dotenv express axios redis
Create a
.envfile to store all secrets.Create an
index.jsfile to hold the major program.The new directory structure should resemble this;
 |
 |--- index.js
 |--- .env
 |--- package.json
In the
.envfile create a variable for your port number and assign it a port number value.PORT = 3030In your
index.jsfile, create a simple Node.Js server using express.const express = require("express"); const app = express(); const port = process.env.PORT || 3000; app.listen(port, () => { console.log(`App listening on port ${port}`); });First, import the necessary modules for creating a server
(express, dotenv).Next, set the
appvariable as an instance ofexpress, which gives you access to methods such asget,post,listen, and many more. In this article, we will focus on thegetandlistenmethods.In the following line, you define and assign the
portvariable to the port number you want the server to listen on. If no port number is available in an environmental variables file, port3000will be used as the default.Finally, use the
appvariable, to invoke theexpressmodule’slisten()method to start the server on port3000.
Run the index.js file
In the terminal run the following command.
node index.js
OUTPUT
App listening on port 3000
Creating a Restful API without Caching
In this section, we will be building on the express server that was created in the previous step.
In the index.js file create a function that would retrieve the number of public repositories a user has from the GitHub API.
const express = require("express");
const axios = require("axios");
const dotenv = require("dotenv");

dotenv.config()

const app = express();
const port = process.env.PORT || 3000;

app.get('/githubretro/without/:username', async (req, res) => {
  try {
    const username = req.params.username;
    let data = await axios.get(`https://api.github.com/users/${username}`);
    console.log("Request gotten from API");
    data = data.data.public_repos;
    res.status(200).json(data);
  } catch (error) {
    console.log(error)
  }
});
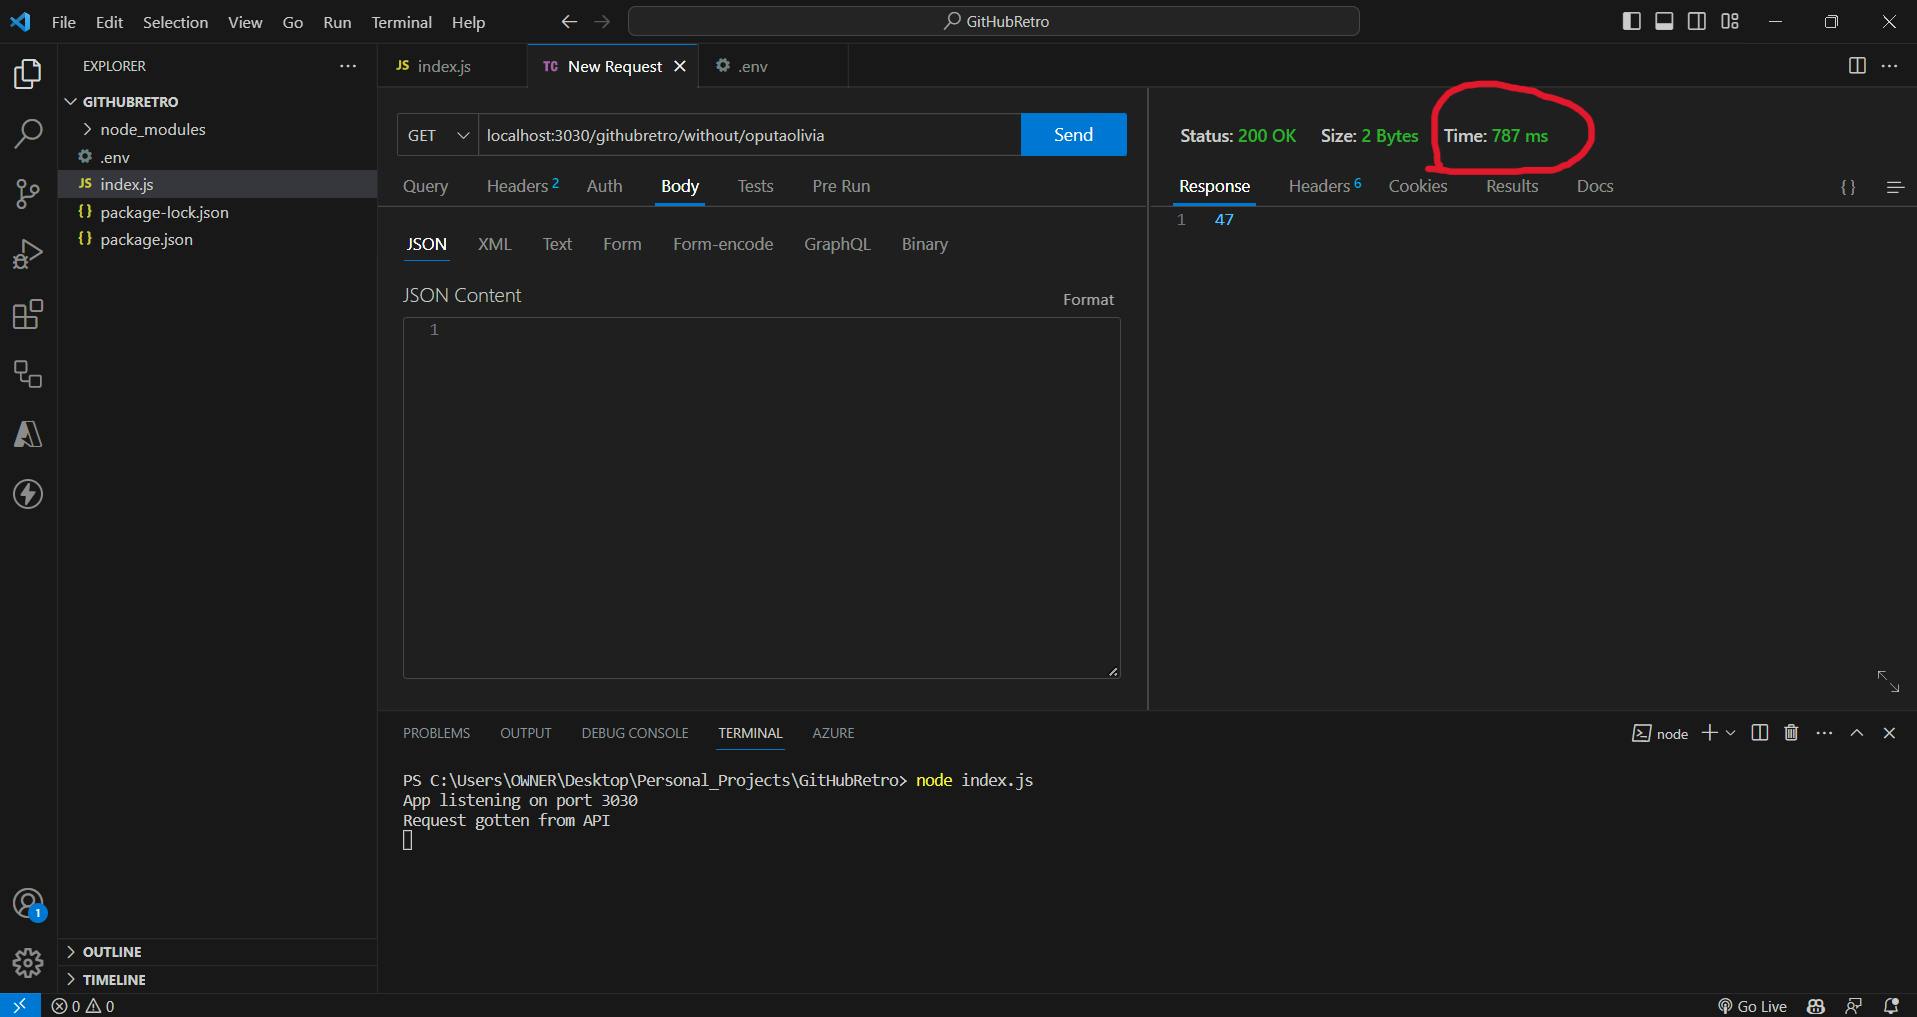
Once the above code has been saved, run the application on the command line using this command:
node index.js
Next, send a request to https://localhost:300/githubretro/without/:username using Thunder Client, the output:
Creating a Restful API with Caching
In this section, the current API endpoint will be optimized by caching the results from the external API so that your endpoint will fetch the external API only the first time a client visits it. All subsequent requests will return the data from the Redis cache.
Now, the Redis module would be utilized. Create a function that will check the Redis cache first if such exists, if it doesn’t exist then data would be fetched from the GitHub API.
Before we create the function, we need to create a database on Redis (You can follow this guide). Once you have a database up and running copy the password and host of your database into the .env file.
PORT= 3030,
REDIS_PASS = <Your_Password>,
REDIS_HOST = <Your_Host>,
const express = require("express");
const axios = require("axios");
const dotenv = require("dotenv")
const redis = require("redis");

dotenv.config()

const app = express();
const port = process.env.PORT || 3000;

let redisClient;
(async () => {
  redisClient = redis.createClient({
    password: process.env.REDIS_PASS,
    socket: {
        host: process.env.REDIS_HOST,
        port: 16388
    }
  });
  redisClient.on("error", (error) => console.error(`Error : ${error}`));
  await redisClient.connect();
})();

app.get('/githubretro/:username', async(req,res)=>{
  try {
    const username = req.params.username;
    const getUserName = await redisClient.get(`username=${username}`);
    let data;
    if (getUserName) {
      data = getUserName;
      console.log("Request gotten from cache");
    } else {
      data = await axios.get(`https://api.github.com/users/${username}`);
      data = data.data.public_repos;
      await redisClient.set(`username=${username}`, JSON.stringify(data));
    }
    res.status(200).json(data);
  } catch (error) {
    console.log(error)
  }
})
app.listen(port, () => {
  console.log(`App listening on port ${port}`);
});
Once the above code has been saved, run the application on the command line using this command:
node index.js
Next, send a request to https://localhost:300/githubretro/with/:username using Thunder Client, the output:

Conclusion
In this simple project, we have demonstrated how Redis can effectively enhance the performance of web applications. By comparing the response times in the two scenarios, it becomes evident that caching significantly reduces the time required for data retrieval compared to direct retrieval.
It is essential to incorporate caching in instances where specific data is frequently accessed. Caches play a pivotal role in improving overall system efficiency and responsiveness.
You can drop a comment in the comment section if there’s something you feel I missed out.
Thanks for reading ☺️